Using YOLO people detection with Segment Anything 2 from META

Introduction

META’s recent release of Segment Anything 2 (SAM2) as a fully open-source project, where both the code and the models are open-source, opens the door for many interesting use cases. One use case is people detection and tracking.

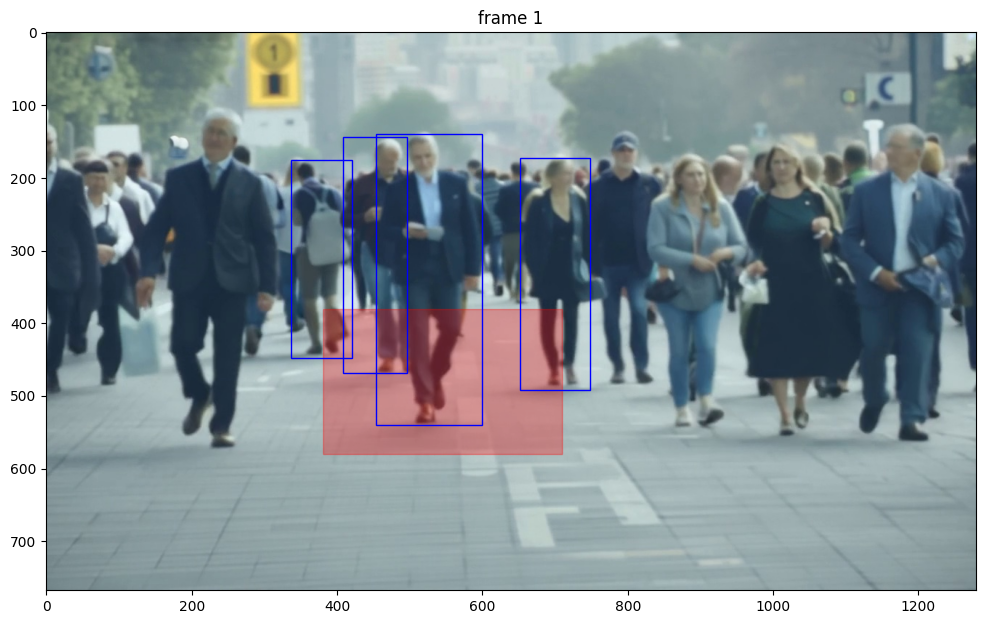
Suppose, for example, that I wanted to detect and track if people enter some region in my camera’s view. The YOLO toolset has been widely used for people detection, and here we use it to detect people whose YOLO-created bounding box intersects with a chosen detection region. Then we use points around the center of that bounding box as seeds for tracking those individuals with SAM2.

Warning

This code is shared purely for research purposes and should not be used as-is for anything beyond education. The reliability of these tools in production settings needs to be tested thoroughly

Code

Code for this post can be found here.

Procedure

  • Create synthetic camera footage with Runway ML Gen 3
  • Pick a frame early in the synthetic footage, in this case, frame 30
  • Designate a detection region in the image
  • Get people detection bounding boxes from the image
  • Get a subset of detection bounding boxes which intersect with the detection region
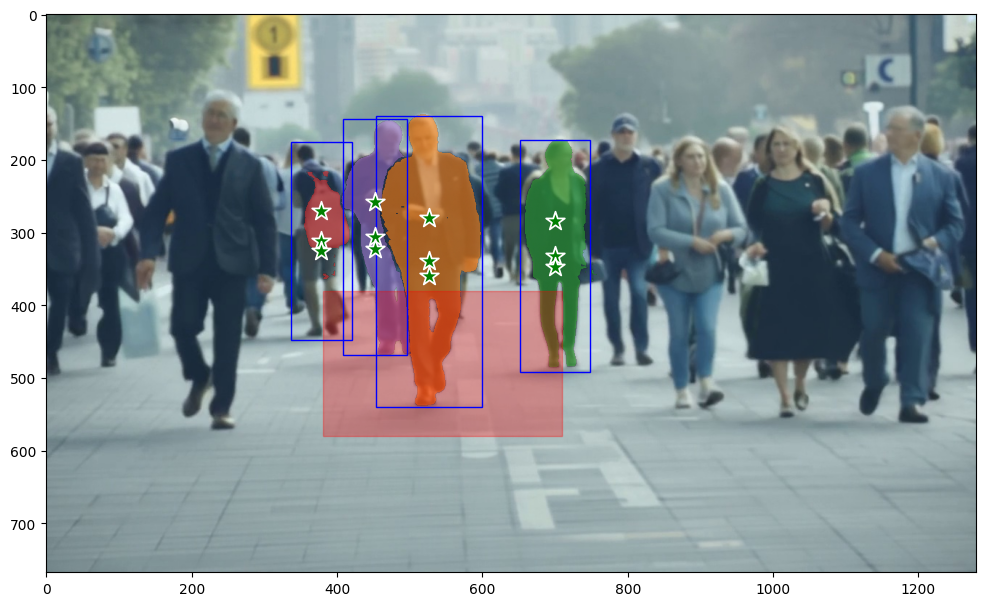
  • Get the center point of the detection bounding boxes in that subset, and use those as seeds for SAM2 to track those individuals through the remainder of the video

Setup

First, we need to set up the environment and install the required packages:

Tip

The pinning of package versions here is to help ensure that this code can work as is out-of-the-box; however, you may get better results by unpinning these versions and just using the latest code. It is generally best practice to pin packages in production environments.

 1
 2
 3
 4
 5
 6
 7
 8
 9
10
11
12
13
14
15
16
# Install necessary packages
!pip install ultralytics==8.2.71
!pip install torch==2.4.0
!pip install torchvision==0.19.0
!pip install torchaudio==2.4.0
!pip install matplotlib==3.9.1
!pip install pillow
!pip install opencv-python-headless==4.10.0.84

# Clone the Segment Anything 2 repository and install it
!git clone https://github.com/facebookresearch/segment-anything-2.git
%cd segment-anything-2
!pip install -e . -q

# Download the pre-trained SAM2 model
!wget -q https://dl.fbaipublicfiles.com/segment_anything_2/072824/sam2_hiera_large.pt -P checkpoints

Loading and Processing the Video

We start by converting the input video into frames. The frames will be processed to detect and segment people.

Info

As of the publication of this post, SAM2 only supports JPEG.

First we do some initial setup:

 1
 2
 3
 4
 5
 6
 7
 8
 9
10
11
12
13
14
15
16
17
18
19
20
21
22
23
24
25
26
27
28
import os
import matplotlib.pyplot as plt
from PIL import Image
import matplotlib.patches as patches
import torch
import numpy as np
import cv2
from ultralytics import YOLO
from sam2.utils.misc import get_sdpa_settings
from sam2.build_sam import build_sam2_video_predictor
from sam2.build_sam import build_sam2
from sam2.sam2_image_predictor import SAM2ImagePredictor

OLD_GPU, USE_FLASH_ATTN, MATH_KERNEL_ON = get_sdpa_settings()
print(f"{OLD_GPU}, {USE_FLASH_ATTN}, {MATH_KERNEL_ON}")

torch.autocast(device_type="cuda", dtype=torch.bfloat16).__enter__()

if torch.cuda.get_device_properties(0).major >= 8:
    torch.backends.cuda.matmul.allow_tf32 = True
    torch.backends.cudnn.allow_tf32 = True

DEVICE = torch.device('cuda' if torch.cuda.is_available() else 'cpu')
CHECKPOINT = f"{HOME}/checkpoints/sam2_hiera_large.pt"
CONFIG = "sam2_hiera_l.yaml"

#sam2_model = build_sam2(CONFIG, CHECKPOINT, device=DEVICE, apply_postprocessing=False)
predictor = build_sam2_video_predictor(CONFIG, CHECKPOINT, device=DEVICE, apply_postprocessing=False)

Next we extract jpg frames from the mp4 video we uploaded to the videos folder:

 1
 2
 3
 4
 5
 6
 7
 8
 9
10
11
12
13
14
15
16
17
18
19
20
21
22
23
24
25
26
27
28
29
30
31
32
33
34
35
36
37
38
39
40
41
42
43
44
45
46
47
48
# Define directories
video_dir = f"{HOME}/videos/"
processed_dir = f"{HOME}/processed"

# Create the processed directory if it doesn't exist
os.makedirs(video_dir, exist_ok=True)
os.makedirs(processed_dir, exist_ok=True)

def convert_mp4_to_jpg(mp4_file, output_folder, one_frame_per_second=False):
    """Converts an mp4 file to high-quality jpg files."""
    os.makedirs(output_folder, exist_ok=True)
    video = cv2.VideoCapture(mp4_file)
    fps = video.get(cv2.CAP_PROP_FPS)
    frame_count = 0
    saved_frame_count = 0

    while True:
        ret, frame = video.read()
        if not ret:
            break

        if one_frame_per_second:
            # Calculate the frame number to save
            if frame_count % int(fps) == 0:
                output_file = os.path.join(output_folder, f"{saved_frame_count:04d}.jpg")
                success = cv2.imwrite(output_file, frame, [int(cv2.IMWRITE_JPEG_QUALITY), 95])
                if success:
                    pass
                    #print(f"Frame {saved_frame_count} written successfully")
                else:
                    print(f"Failed to write frame {saved_frame_count}")
                saved_frame_count += 1
        else:
            output_file = os.path.join(output_folder, f"{frame_count:04d}.jpg")
            success = cv2.imwrite(output_file, frame, [int(cv2.IMWRITE_JPEG_QUALITY), 95])
            if success:
                pass
                #print(f"Frame {frame_count} written successfully")
            else:
                print(f"Failed to write frame {frame_count}")

        frame_count += 1

    video.release()

mp4_file_path = f"{HOME}/videos/input_video.mp4"  # Replace with your mp4 file path
output_folder_path = f"{HOME}/processed"
convert_mp4_to_jpg(mp4_file_path, output_folder_path, one_frame_per_second=False)

Finally, we put all the frame file paths in a list for later processing:

1
2
3
4
5
6
7
8
# Scan all the frame names in the processed directory
processed_frame_names = [
    p for p in os.listdir(output_folder_path )
    if os.path.splitext(p)[-1].lower() in [".jpg", ".jpeg"]
]

# Sort frame names by extracting the numerical part of the filenames
processed_frame_names.sort(key=lambda p: int(os.path.splitext(p)[0].split('_')[-1]))

People Detection and Segmentation

Detecting people with YOLO

Using YOLO, we detect people in the frames and highlight those whose bounding boxes fall within a designated red zone.

Frame 30 with detection region masked transparent-red and blue bounding boxes from YOLO people detection

We pick which frame to detect in and set an image_path variable:

1
2
3
4
# which frame to detect on and set an image_path variable
frame_idx = 30
image_path = os.path.join(output_folder_path, processed_frame_names[frame_idx])
image = cv2.imread(image_path)

Next we add a function to plot the detection region:

 1
 2
 3
 4
 5
 6
 7
 8
 9
10
11
12
13
14
15
16
# Define and add the rectangle patch with transparency
rect_x = 380
rect_y = 380
rect_width = 330
rect_height = 200
# Define a function to plot the figure and rectangle patch
def plot_with_rect(ax, image, rect_x, rect_y, rect_width, rect_height):
    # Display the original image
    ax.imshow(image)

    # Create and add the rectangle patch
    rect = patches.Rectangle(
        (rect_x, rect_y), rect_width, rect_height,
        linewidth=1, edgecolor='r', facecolor='red', alpha=0.3
    )
    ax.add_patch(rect)

Now we perform the people detections:

Warning

We are using YOLOv5 here, but there are newer version available.

 1
 2
 3
 4
 5
 6
 7
 8
 9
10
11
12
13
14
15
16
17
18
19
20
21
22
23
24
25
26
27
28
29
30
31
32
33
34
35
36
37
38
39
40
41
42
image = Image.open(image_path)

# Display the image
plt.figure(figsize=(12, 8))
ax = plt.gca()
plt.title(f"frame {frame_idx}")
plt.imshow(image)


# Add the patch to the Axes
plot_with_rect(ax, image, rect_x, rect_y, rect_width, rect_height)


# Load YOLO model
yolo_model = YOLO('yolov5su.pt')  # Use the appropriate YOLOv5 model

# Load the image with OpenCV
cv2_image = cv2.cvtColor(np.array(image), cv2.COLOR_RGB2BGR)

# Detect objects in the image
results = yolo_model(cv2_image)

# Filter detections to find people
detected_people_centers = []
filtered_boxes = []
for result in results[0].boxes.data:  # Accessing the first result and its boxes
    x1, y1, x2, y2, conf, cls = result.cpu().numpy()  # Transfer to CPU and convert to numpy array
    if int(cls) == 0:  # Class 0 is 'person' in COCO
        if (x1 < rect_x + rect_width and x2 > rect_x and y1 < rect_y + rect_height and y2 > rect_y):
            center_x = (x1 + x2) / 2
            center_y = (y1 + y2) / 2
            detected_people_centers.append([center_x, center_y])
            filtered_boxes.append((x1, y1, x2, y2))
            # Draw bounding box
            plt.gca().add_patch(patches.Rectangle((x1, y1), x2 - x1, y2 - y1, linewidth=1, edgecolor='b', facecolor='none'))

# Convert detected people centers to a numpy array
points = np.array(detected_people_centers)
labels = np.ones(len(points), dtype=np.int32)

# Display the updated plot with bounding boxes
plt.show()

Initializing the Segment Anything 2 Predictor

We initialize the SAM2 predictor to generate masks for each detected person as follows.

Note

You’ll notice that in addition to using the point of center of the bounding boxes, we use two more points slightly above it. This is done to improve the SAM2 detection results. The YOLO bounding box center is typically around the midsection of a detected individual, so selecting a few points above helps ensure we target the whole individual more reliably with SAM2.

Frame 30 with detection region masked transparent-red and blue bounding boxes from YOLO people detection; in addition we now show the transparent masks from SAM2

We use some functions to help us with plotting and DRYing up some detections. These first two functions come directly from SAM2’s example notebook:

 1
 2
 3
 4
 5
 6
 7
 8
 9
10
11
12
13
14
15
16
def show_mask(mask, ax, obj_id=None, random_color=False):
    if random_color:
        color = np.concatenate([np.random.random(3), np.array([0.6])], axis=0)
    else:
        cmap = plt.get_cmap("tab10")
        cmap_idx = 0 if obj_id is None else obj_id
        color = np.array([*cmap(cmap_idx)[:3], 0.6])
    h, w = mask.shape[-2:]
    mask_image = mask.reshape(h, w, 1) * color.reshape(1, 1, -1)
    ax.imshow(mask_image) 

def show_points(coords, labels, ax, marker_size=200):
    pos_points = coords[labels==1]
    neg_points = coords[labels==0]
    ax.scatter(pos_points[:, 0], pos_points[:, 1], color='green', marker='*', s=marker_size, edgecolor='white', linewidth=1.25)
    ax.scatter(neg_points[:, 0], neg_points[:, 1], color='red', marker='*', s=marker_size, edgecolor='white', linewidth=1.25) 

We also have a few helper functions to make our code DRY/cleaner:

 1
 2
 3
 4
 5
 6
 7
 8
 9
10

def find_center_point(x1, y1, x2, y2):
    cx = (x1 + x2) / 2
    cy = (y1 + y2) / 2
    return [(cx, cy)]

def add_points_around_bbox(x1, y1, x2, y2, distance):
    cx = (x1 + x2) / 2
    cy = (y1 + y2) / 2
    return [(cx, cy), (cx, cy + distance), (cx, cy - 3*distance)]

This is the important loop that applies SAM2 to the detected individuals:

 1
 2
 3
 4
 5
 6
 7
 8
 9
10
11
12
13
14
15
16
17
18
19
20
21
22
23
24
25
26
27
28
29
30
31
32
33
34
35
36
37
38
39
40
41
42
43
44
45
46
47
48
49
50
51
52
53
54
55
56
57
58
59
60
61
62
63
64
65
66
67
68
69
70
71
72
73
74
75
from sam2.utils.misc import get_sdpa_settings
from sam2.build_sam import build_sam2_video_predictor

OLD_GPU, USE_FLASH_ATTN, MATH_KERNEL_ON = get_sdpa_settings()
DEVICE = torch.device('cuda' if torch.cuda.is_available() else 'cpu')
CHECKPOINT = f"{HOME}/checkpoints/sam2_hiera_large.pt"
CONFIG = "sam2_hiera_l.yaml"
predictor = build_sam2_video_predictor(CONFIG, CHECKPOINT, device=DEVICE, apply_postprocessing=False)

# Load and display the initial frame with masks
def show_mask(mask, ax, obj_id=None, random_color=False):
    if random_color:
        color = np.concatenate([np.random.random(3), np.array([0.6])], axis=0)
    else:
        cmap = plt.get_cmap("tab10")
        cmap_idx = 0 if obj_id is None else obj_id
        color = np.array([*cmap(cmap_idx)[:3], 0.6])
    h, w = mask.shape[-2:]
    mask_image = mask.reshape(h, w, 1) * color.reshape(1, 1, -1)
    ax.imshow(mask_image)

def show_points(coords, labels, ax, marker_size=200):
    pos_points = coords[labels==1]
    neg_points = coords[labels==0]
    ax.scatter(pos_points[:, 0], pos_points[:, 1], color='green', marker='*', s=marker_size, edgecolor='white', linewidth=1.25)
    ax.scatter(neg_points[:, 0], pos_points[:, 1], color='red', marker='*', s=marker_size, edgecolor='white', linewidth=1.25)

with torch.inference_mode(), torch.autocast("cuda", dtype=torch.bfloat16):
    inference_state = predictor.init_state(video_path=output_folder_path)

    plt.figure(figsize=(12, 8))
    ax = plt.gca()
    # Display the original image
    ax.imshow(image)

    # Add the patch to the Axes
    plot_with_rect(ax, image, rect_x, rect_y, rect_width, rect_height)

    # Track initial masks for each detected person
    initial_points = {}
    initial_masks = {}

    for ann_obj_id, (x1, y1, x2, y2) in enumerate(filtered_boxes, start=1):
        # Generate points within the bounding box and additional points above and below
        bbox_height = y2 - y1
        additional_distance = 0.05 * bbox_height
        extended_points = add_points_around_bbox(x1, y1, x2, y2, additional_distance)
        extended_points = np.array(extended_points)
        extended_labels = np.ones(len(extended_points), dtype=np.int32)

        # Store the initial points for later use
        initial_points[ann_obj_id] = (extended_points, extended_labels)

        # Add new points for the first frame (using the extended points)
        if extended_points.size > 0:
            predictor.reset_state(inference_state)
            _, out_obj_ids, out_mask_logits = predictor.add_new_points(
                inference_state=inference_state,
                frame_idx=frame_idx,
                obj_id=ann_obj_id,
                points=extended_points,
                labels=extended_labels,
            )

            initial_masks[ann_obj_id] = (out_mask_logits[0] > 0.0).cpu().numpy()

            # Draw the YOLO bounding box
            ax.add_patch(patches.Rectangle((x1, y1), x2 - x1, y2 - y1, linewidth=1, edgecolor='b', facecolor='none'))

            # Overlay the SAM2 mask
            show_mask(initial_masks[ann_obj_id], ax, obj_id=ann_obj_id)
            show_points(extended_points, extended_labels, ax)

    # Show the final plot with the highlighted people
    plt.show()

Propagating SAM2 Detections Forward Throughout the Video

We propagate the masks generated in the first frame through the entire video.

Note

The way we are doing this here is not efficient as we are propagating one detected person at a time, and then applying the masks later to the final image. This was done because detecting multiple people at once was showing some unwanted artifacts. In a future iteration of this, we will try to do the propegation for all detected points at the same time rather than via loops.

 1
 2
 3
 4
 5
 6
 7
 8
 9
10
11
12
13
14
15
16
17
18
19
20
21
22
23
# Initialize a dictionary to store masks per frame per person
video_segments = {}

# Run propagation for each detected person individually
with torch.inference_mode(), torch.autocast("cuda", dtype=torch.bfloat16):
    for ann_obj_id, (points, labels) in initial_points.items():
        # Reset the state for the current object
        inference_state = predictor.init_state(video_path=output_folder_path)
        predictor.reset_state(inference_state)
        predictor.add_new_points(
            inference_state=inference_state,
            frame_idx=frame_idx,
            obj_id=ann_obj_id,
            points=points,
            labels=labels,
        )

        # Propagate the masks for the current object throughout the video
        for out_frame_idx, out_obj_ids, out_mask_logits in predictor.propagate_in_video(inference_state):
            if out_frame_idx not in video_segments:
                video_segments[out_frame_idx] = {}
            if ann_obj_id in out_obj_ids:
                video_segments[out_frame_idx][ann_obj_id] = (out_mask_logits[out_obj_ids.index(ann_obj_id)] > 0.0).cpu().numpy()

We save the output frames as PNG for better quality (though at a cost of more disk space):

 1
 2
 3
 4
 5
 6
 7
 8
 9
10
11
12
13
14
15
16
17
18
# Define the output directory for the frames
output_dir = os.path.join(f"{HOME}", 'output_frames')
os.makedirs(output_dir, exist_ok=True)
# Render the segmentation results every x frame and save as PNG
vis_frame_stride = 1
plt.close("all")
frame_paths = []
for out_frame_idx in range(0, len(processed_frame_names), vis_frame_stride):
    plt.figure(figsize=(6, 4))
    plt.title(f"frame {out_frame_idx}")
    plt.imshow(Image.open(os.path.join(processed_dir, processed_frame_names[out_frame_idx])))
    if out_frame_idx in video_segments:
        for out_obj_id, out_mask in video_segments[out_frame_idx].items():
            show_mask(out_mask, plt.gca(), obj_id=out_obj_id)
    frame_path = os.path.join(output_dir, f"frame_{out_frame_idx:04d}.png")
    plt.savefig(frame_path)
    frame_paths.append(frame_path)
    plt.close()

Generating the Output Video

Finally, we compile the processed frames into an output video.

 1
 2
 3
 4
 5
 6
 7
 8
 9
10
11
12
13
from moviepy.editor import VideoFileClip, ImageSequenceClip

# Path to the input video
input_video_path = os.path.join(f"{HOME}", 'videos', 'input_video.mp4')

# Detect the frame rate of the input video
video_clip = VideoFileClip(input_video_path)
frame_rate = video_clip.fps

# Create a video from the saved frames using moviepy
video_output_path = os.path.join(f"{HOME}", 'videos', 'output_video.mp4')
clip = ImageSequenceClip(frame_paths, fps=frame_rate)
clip.write_videofile(video_output_path, codec='libx264')

The resulting video demonstrates how SAM2 maintains distinct object tracking throughout the video duration:

Note how the occlusion of the person masked in green by the person masked in orange does not cause the loss of tracking for the person masked in green. Even more impressive, the person masked in red is not lost by SAM2 despite being heavily occluded.

Conclusions

We demonstrated a way to detect and track people seen passing through a designated detection region in a video using YOLO to bootstrap SAM2. Next steps include:

  • Cleaning up the code, de-looping the detection (see note in the SAM2 process section)
  • Dockerizing this process
  • Exploring monocular depth estimation as a way to more accurately detect proximity:
    • Monocular depth estimation uses trained models that can pick up lighting cues to recreate the information related to the z axis in 2D video.
    • In a subset of cases (perhaps even the majority of cases?), this recreation of z-axis depth perception is accurate enough to provide reliable detection of proximity in all three dimensions of space.
    • Monocular depth estimation is being studied, for example, by Toyota in regards to autonomous vehicle driving. Further, the related field of Gaussian Splat is a very active area of research.
You are a wonderful manifestation of the evolution of the universe.
Built with Hugo / Theme --> Stack